When last I wrote, I said that I was building a Rostock Mini 3D printer. That is still true but I hit a few snags. The creator, who did a lot of cool work making a parameterized design for it, never quite published his extruder design. That means that I’ve been trying to figure out how I was going to get the business end of the printer extruding plastic. I’ve been looking at v3 of the Airtripper Bowden Extruder but had to order a bunch of parts for it. (As an aside, while I do everything in metric to maintain compatibility with the worldwide making community, it is a real pain to get metric screws of all sizes in any number so I have to order them and wait wait wait…) This combined with needing to replace the carbon pieces that I was using for arms meant that I was a little stalled out on the Rostock Mini.
Foldarap by Emmanuel Gilloz
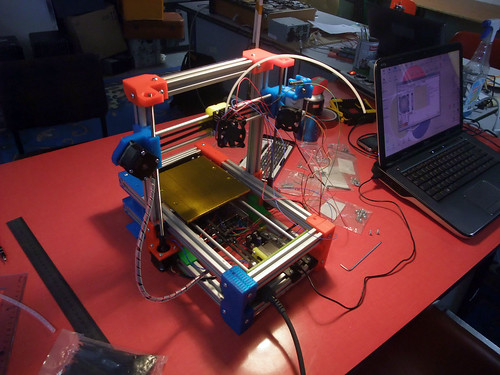
So, like any dumb hacker, I decided to work on another printer instead. I guess I’ve caught the reprap bug. I decided to make a FoldaRap. Emmanuel Gilloz, a French hacker, came up with his own RepRap design that uses 20 mm extruded aluminum (which is cheap) that can be folded up and put into a padded case. This makes it a both affordable design but one that can easily be taken to hackerspaces, conferences, or other events. Since I’ve had to lug my Up! Plus to Ace Monster Toys three or four times in the foot well of my car, this is a real plus.
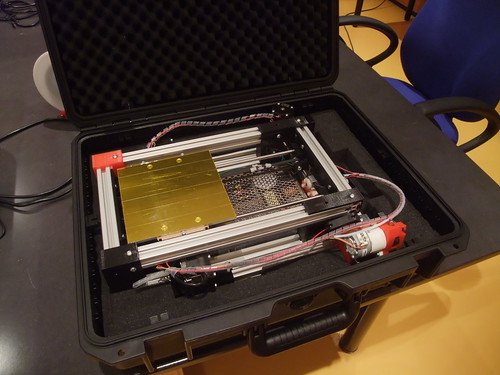
Foldarap in Suitcase by Emmanuel Gilloz
Building this, the most difficult part has been sourcing the materials. Emmanuel is in France and they have a different convenient supply chain in Europe. He published his build of materials but I had to do my best to make some adjustments (and find yet more metric screws). The two biggest issues were the source of the aluminum extrusion and the fact that he used some RepRap Huxley components, including a Huxley hotend.
With the Huxley components, that meant that he used a 140 mm square aluminum heating bed. Since Prusa Mendels are the most common RepRaps that I see here in the US, I either had to order overseas for the bed or cut my own. I actually found an individual making them, removing the necessicity to cut my own plate and then tap it for screw holes for mounting.
Most American builders are using hotends from Makergear or J-Head hotends (which are out of stock for my size plastic except for Chinese copies). I didn’t feel inclined to deal with yet another custom extruder system (see Rostock Mini issues at beginning of post) so I wound up getting the Huxley extruder that Emmanuel recommended, minus a few unnecessary parts.
The extrusion of choice here in the US is MiSumi 2020. It costs $3 for a 300 mm long piece, which means for about $30 plus cheap shipping (in California even), I can have regular, solid aluminum pieces. As a bonus, Misumi will cut to length in half millimeter increments so the pieces arrive ready to go.
All of my materials arrived about a week ago except for my Huxley hotend and my aluminum (with the exception of my control electronics). I used my existing printer to start making pieces per the FoldaRap design and immediately hit a snag: my plastic wouldn’t fit on my extrusion. (No, that isn’t a euphemism.) I asked Emmanuel about it on the RapRap forums and he was very responsive to questions. Initially, it seemed that my Up! wasn’t printing with enough precision to fit the gap between my extrusion but, pulling out my calipers and then looking at Emmanuel’s designs, I found that his design had a 1.5 mm gap where my extrusion was (roughly) 2 mm thick:
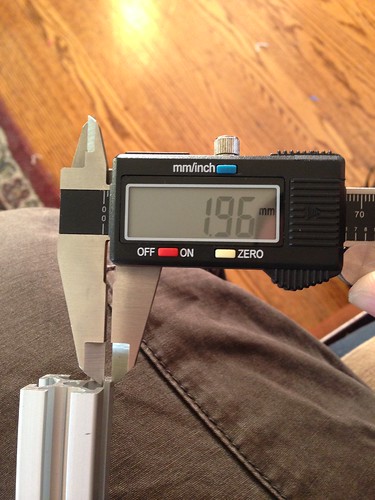
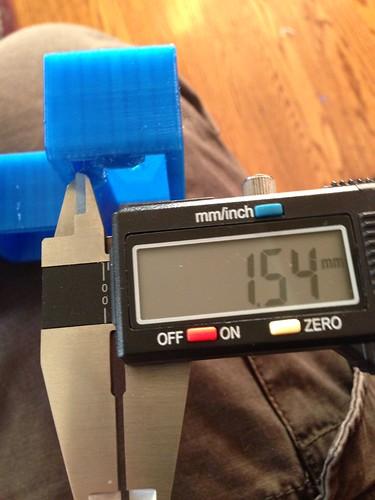
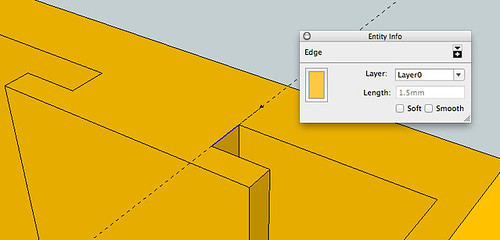
not 2 mm!
Luckily for me, open source wins! Emmanuel has the source for the FoldaRap up on github. Like many hackers, he does all of his 3D design in Sketchup (because it is free and easy to use, I assume). I’ve never done much with it but I’ve seen it used at AMT quite a bit by a few of our members. A quick download of it and the github source and I had parts to stare at. I then spent an hour givining myself a crash course in how to alter metric parts in Sketchup, expanding the gap in the above picture by half a millimeter on four pieces that needed to fit with a plastic ‘T’ connector. Exporting it out to STL format, I started a test print and went to dinner with my wife. On returning home, I tried it out and it worked!
If Emmanuel wants it, I’ll submit a patch to Github with the Misumi specific changes to the four files. I made a separate sketchup file with just those four pieces in it. That might be my first submitted patch on github if I do so.
I’m now printing out the other three pieces (two of them are three hour prints each) so I can begin the actual process of assembling the FoldaRap over this three day weekend. Given the missing electronics and general slackitude, I don’t expect that I’ll finish it this weekend (hmm…I’m missing my power supply as well, come to think of it) but I do expect progress. I’ll then get back to my pesky Rostock Mini. I expect that the FoldaRap build will go quite a bit more quickly as Emmanuel’s build documentation is quite thorough with both pictures and video of the various stages.