I haven’t posted in a while here, largely because I haven’t finished any interesting projects lately. The one thing that I’ve been building recently is a delta printer. This is a slightly different design than the standard for a reprap printer.
Johann, up in Seattle, has been playing with these during the last eight months or so. He published an initial design on Thingiverse, which led to a lot of people getting excited and working on the project. (In fact, there is a very active Google Group for it, right now.)
You can see his original version doing a print below:
For those familiar with reprap printers, this is a very different model for moving the printing head.
Brian Evans in Colorado came up with a variant, called the Rostock Mini (or here. Originally, it was meant to be a more desktop sized version of the Rostock, as they can get quite large. In the process of making it, Brian created an OpenSCAD version of it that is parameterized, so you can create an arbitrarily sized version. It turns out, it isn’t really that desktop sized but it more convenient.
Right now, I have an Up! Plus printer, which is a closed source Chinese printer. It is pretty reliable but you can’t do fairly standard things, within the open source reprap community, like tweaking the slicer settings or temperatures. While I’ve enjoyed using it, I’ve found it frustrating enough that I wanted to build a new reprap printer. Seeing Brian’s design, I decided to start on a Rostock Mini a couple of months ago. It took a while for me to get parts printed, then I had to track down all of the various metric screws, bolts, etc., as well as electronics for it and steppers. If there is a complaint that I have about making reprap printers, it is that by the time you source all of the parts from various places, it winds up being at least 30% more expensive than you expect and you often sit around waiting for a single piece that you’re missing. In fact, at this moment, I’m still waiting to track down pieces for my Bowden extruder, needing just one or two of several screws which are sold in bags of 50 or 100 for $10.
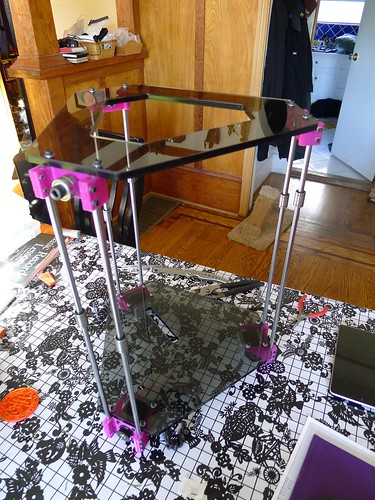
That said, I made significant progress on putting everything together the other day, as you can see below. I printed out most of my plastic components in a colorful purple PLA plastic. I found some cast off pieces of smoking acrylic at Ace Monster Toys (they were corners left over from a larger project) and cut them on our lasercutter, along with some cork for dampening motor vibration. This weekend, I got the basic frame assembled except for the extruder platform and the three carriages where it mounts to the frame.
You can see my whole photo set for the build so far over on Flickr.
The next steps are to get the extruder platform built and the hot end mounted, then connecting belts to motors, and mounting electronics. Finally, I’ll have to get the Bowden extruder mounted to it and connected.
I figure it might take me another month to get it built as I’m not in a rush but it looks pretty good so far and I’m looking forward to seeing how well it prints.

